Having both a new ice cream machine and a book filled with ice cream recipes should be total bliss! Too bad it's been raining almost non-stop these past few weeks...
But that hasn't stopped me completely from making ice cream. Every time the temperature rose slightly I ran to the store to get everything I needed to make some sort of ice cream. Any sort of ice cream... Doesn't matter what!
So when the temperature was going to rise again and I found good, ripe, flavourful peaches, it was meant to be...
Peach ice cream! I wanted a really fresh ice cream and found a recipe for Peach Frozen Yoghurt! Perfect!
The recipe is easy, but you still have to cook the peaches, so if at all possible....plan ahead, so you have enough time to let the mixture cool down. The recipe calls for 1/2 cup of water but I think you can minimize that further to 1/4 cup and up the yoghurt to 1 1/4 cup, that way it becomes a little creamier.
Recipe
Peach Frozen Yoghurt
Yield: about 3 cups
1 1/2 pound peaches (4-5 peaches)
1/4 - 1/2 cup water
3/4 cup sugar
1 - 1 1/4 cup plain whole-milk yoghurt
A few drops lemon juice
Instructions:
Peel the peaches, slice them in half and remove the pits.
Cut the peaches into chunks and cook them with the water in a medium, nonreactive, saucepan over medium heat, covered, stirring occasionally, until soft and cooked through, about 10 minutes.
Remove from the heat, stir in the sugar and chill in the refrigerator.
When the peaches are cool, purée them in a blender or food processor with the yoghurt until almost smooth, but slightly chunky.
Mix in a few drips of lemon juice.
Freeze the mixture in your ice cream machine according to the manufacturer's instructions.
Enjoy!
Source: The Perfect Scoop, David Lebovitz
Thursday, June 30, 2011
Monday, June 27, 2011
Cinnamon Squares

For my birthday I got two cookbooks: Baking, from my homepage to yours, by Dorie Greenspan and The perfect scoop by David Lebovitz. Although these books are already well known in a lot of countries. Over here they aren't, so I'm very happy with these books. You should probably prepare yourself for a lot of recipes by Dorie and David.
While reading Dorie's book my eye was caught by a lot of yummy looking things, among which these Cinnamon Squares. As we've had a lot of rain these past few days I was in the mood for a heartwarming pick-me-up. These squares called out to me. Cinnamon is one of my favorite spices and one I especially love on cold days.
The recipe was easy to follow and the end result was everything I hoped it would be. Fragrant, flavourful and heartwarming. And although the filling sunk to the bottom (again, I know) it still tasted great. And for a change I know why the filling sunk. I used normal chocolate chips instead of mini ones....
I will definetely make this more often! It's recipes like this one that have me yearning for fall!

Recipe
Cinnamon Squares
Yield: 9 large, 12 medium or 16 small squares
Ingredients:
For the cake:
1 1/4 cups plus 2 tablespoons sugar
1 tablespoon plus 2 1/2 teaspoons ground cinnamon
1 1/2 teaspoons instant espresso powder
1 3/4 cups flour
2 teaspoons baking powder
Pinch of salt
3/4 cup whole milk
2 large eggs
1/2 teaspoon vanilla extract
10 tablespoons butter, melted and cooled
3 ounces bittersweet chocolate, finely chopped or 1/2 cup mini chocolate chips
For the frosting:
6 ounces bittersweet chocolate, finely chopped
2 1/2 tablespoons butter, cut into 4 pieces

Instructions:
Center a rack in the oven and preheat the oven to 180 degrees C. (350 degrees F.).
Butter an 8-inch square baking pan or something close to it. Line the bottom with parchment paper.
In a small bowl stir together 2 tablespoons of sugar, 2 1/2 teaspoons of cinnamon and the espresso.
In a large bowl whisk together the flour, the remaining sugar, the baking powder, salt and the remaining cinnamon.
In another bowl whisk together the milk, eggs and vanilla.
Pour the liquid ingredients over the flour mixture and whisk gently until you have a homogenous batter.
With a whisk or a rubber spatula fold in the butter with a light touch, just until the butter is absorbed. You'll have a smooth, satiny batter.
Scrape half the batter into the pan and smooth the top.
Sprinkle the chocolate over the batter and dust with the cinnamon-sugar mixture.
Cover with the rest of the batter and smooth the top again.
Bake for 35-40 minutes until the cake is puffed and beginning to pull away from the sides of the pan. A toothpick inserted in the middle should come out clean.
Transfer the cake to a cooling rack and let it rest for 15 minutes before unmolding it onto another rack. Peel off the paper, invert it onto the first rack and let cool to room temperature, right side up.
To make the frosting:
Put the chocolate and butter in a heatproof bowl over a saucepan of simmering water.
Cook, stirring gently and often, just until they melt. Be careful not to overheat the mixture so much that it thins out; the chocolate should be smooth, very shiny, thick and spreadable.
Using an offset metal icing spatula or a table knife, spread the frosting in generous sweeps and swirls over the top of the cake. Allow the frosting to set at room temperature, then cut into squares.


Friday, June 17, 2011
Coke Icee
The day of my birthday party was extremely warm and as there were a couple of kids I wanted to have something for them to enjoy. Well, something other than cake and God knows what more. I wanted to have something for them to be able to cool off a little, while not completely filling them with ice cream.
And then I ran into something amazing. A lifesaver, the easiest thing to make. It felt like a real eye-opener. Why had I not thought about this? Why didn't I come up with this amazing idea??
Are you curious yet? Over on Bake at 350 I found a "recipe" for Coke Icees. And yes the " " are there for a reason, because you can't really call it a recipe. It's that easy!
You just take some Coke. I guess how much you need, depends on how much you want to make and the limits of your ice cream maker. Anyway, you pour the Coke into your ice cream maker, just as you would with your normal base for ice cream. And you let the ice cream maker churn away for about 20 minutes.
That's it! And you know what.... as long as you don't use a soda with artificial sweeteners, you can use any kind of soda you like!
I'm telling you... this is a gift from God!
So if you have kids, or not, doesn't matter, and if it's warm, or not, doesn't matter, go make this! And be ready to be loved by everyone who has one of these amazing icees!
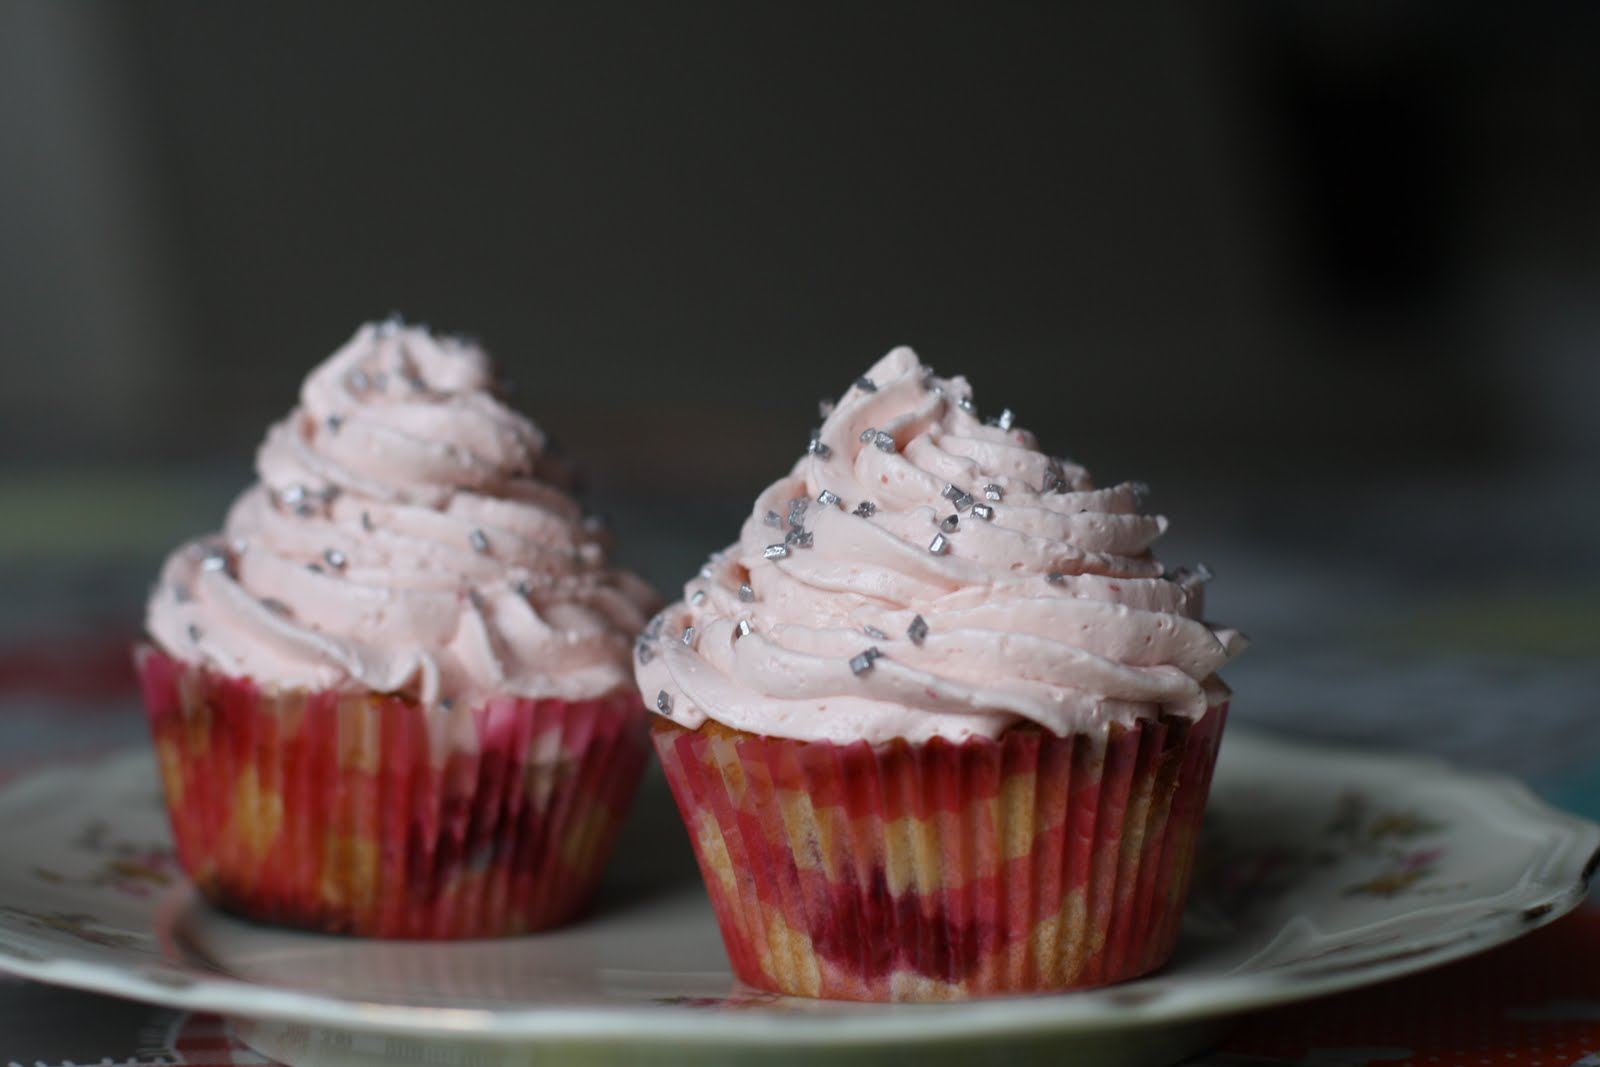
White Chocolate and Raspberry Cupcakes

After my birthday party I found myself with a couple of left-over ingredients from the Chocolate Raspberry Cake and really wanted to use them. I concentrated on the fresh raspberries and the raspberry frosting and remembered a recipe by Ainsley Harriot. This particular recipe was about a muffin with white chocolate and raspberries, but as I am incapable of producing a normal muffin, I decided to adjust this idea into a cupcake.

And I have to say that I'm quite pleased with the end result. Big chunks of white chocolate and the juiciness of the raspberries make this a great cupcake, but the adding of the raspberry frosting elevates this into a great cupcake. Even my husband, who usually doesn't really like sweet and sugary cupcakes, loved this one!
Needless to say the cupcakes were gone all too soon....

Recipe
White Chocolate and Raspberry Cupcakes
Yield: 12
Ingredients:
Cupcakes:
125 gram (1 stick and 1 tablespoon) butter, room temperature
125 gram (2/3 cup) granulated sugar
2 large eggs
125 gram (1 cup and 2 tablespoons) self-raising flour
1/2 teaspoon vanilla-extract
2 tablespoons milk
125 gram (about 4 oz.) fresh raspberries
100 gram (3.5 oz.) chopped white chocolate, not too finely chopped
Raspberry frosting (this renders a lot of frosting, for a huge cake, so adjust to how much you need):
1 cup sugar
4 large egg whites
21 tablespoons butter, at room temperature
1/3 cup strained raspberry purée
1/2 teaspoon vanilla extract
Instructions:
Cupcakes:
Preheat the oven to 200˚C (400˚F).
Cream together the butter and sugar until light and fluffy.
Add the vanilla.
Add one egg at a time, followed by a tablespoon of flour, beating until the egg is completely incorporated before adding the next.
Stir in the rest of the flour.
When everything is mixed well, you can add the milk, as much as you think you need, I usually add 2 tablespoons, but you can use more or less.
Add the chocolate and the raspberries and very gently fold them into the batter.
Fill your muffin tray or just paper liners about 2/3 full and bake for 15-20 minutes, until a toothpick inserted comes out clean.
Let the cupcakes cool on a wire rack to cool completely before frosting with the raspberry frosting.

Raspberry frosting:
Combine the sugar and egg whites in a heatproof bowl set over a pot of simmering water.
Heat, whisking frequently, until the mixture reaches about 70°C (160°F) and the sugar has dissolved.
Transfer the mixture to the bowl of a stand mixer fitted with the whisk attachment.
Beat on medium-high speed until stiff peaks form and the mixture has cooled to room temperature, about 8 minutes (the bowl should be cool to the touch).
Reduce the speed to medium and add the butter, 2 tablespoons at a time, adding more once each addition has been incorporated and just keep going. If the frosting looks soupy or curdled, continue to beat on medium-high speed until thick and smooth again, about 3-5 minutes more (or longer).
Blend in the raspberry puree and vanilla until smooth and completely incorporated.
Sunday, June 12, 2011
Not-so-summery Strawberry Cake
It's time for a first! My first blog made on my brand new iPad! So don't be angry of it looks terrible or strange.... The summer vacation is almost here and I want to try and blog a little, while being in France. Not that I plan on doing a lot of cooking but we always see so many fantastic things, I thought it would be nice to be able to share it with you. So consider this a practice run. There will probably follow a few more.
But enough about that. After all the title of this article isn't: Yeah, I'm blogging from my iPad.
I had a pound of strawberries left-over and had recently read a recipe on SmittenKitchen for a Strawberry Summer Cake. It seemed like fate.
I set to work. The recipe was easy enough and presented no problems.

Before putting it in the oven it looked amazing.
But somehow while baking something went wrong. Instead of staying on top, the strawberries sunk straight to the bottom, where they completely dissolved.

It made the cake a real dissapointment and not something I'll be making again...
Wednesday, June 8, 2011
Chocolate Raspberry Cake

As I mentioned I fell in love with a Chocolate Raspberry Cake by Annie's Eats which I decided to make for my birthday. I had never actually made a real grown-up layer cake before, but decided to just go for it.
I started a week ahead with a trial bake for the chocolate cake which was in the recipe. Unfortunately it was a big disappointment. It was extremely heavy and much too moist for me. I wanted a nice fluffy and light chocolate cake. So I decided to make a sponge cake with some cocoa added for the chocolate flavour. And boy, was I glad I did! The frostings and fillings make this a quite heavy cake, but the light sponge cake makes it so much more balanced out! It is a great combination of textures and flavours.
This is not a cake you can just whip up. I planned an entire day for making this cake. This gave me plenty of time and kept the stress to a bare minimum. I had plenty of breaks so when the cake was finished I was not completely exhausted.
I wasn't sure about adding the chocolate glaze on top of the cake, but you should definitely add it. It completely transforms the cake. The recipe makes to much of the raspberry filling and the raspberry frosting, but you can easily use the left-overs for some wonderful other things. I also made a simple ganache for the top layer instead of chocolate glaze, but this was more because I didn't have any light corn syrup and that is something I can't easily come by.
Oh, one more thing... it was quite warm the day I made this, which made handling this cake quite tricky. I had to put the cake in the fridge a couple of times to make sure everything stayed were it was supposed to stay. And you should keep the cake in the fridge until serving time!
The end result is breathtaking. So if you have a special occasion coming up, make this cake! You won't regret it!

Recipe
Chocolate Raspberry Cake
Ingredients:
Chocolate cake:
1 7/8 cups flour
30 gram (1/4 cup) cocoa powder
9 eggs
1 1/8 cups caster sugar
90 gram (3 oz) butter, melted
Raspberry filling:
16 oz. frozen raspberries, thawed in a sieve over a bowl
1/3 cup sugar
3 tablespoons cornstarch
1 teaspoon lemon juice
Ganache filling:
8 oz. bittersweet chocolate, finely chopped
1 cup heavy cream
3 tablespoons butter, at room temperature
Raspberry frosting:
1 cup sugar
4 large egg whites
21 tablespoons butter, at room temperature
1/3 cup strained raspberry puree
1/2 teaspoon vanilla extract
For the chocolate glaze:
4 oz. bittersweet chocolate, finely chopped
1/2 cup heavy whipping cream
2 tablespoons butter, at room temperature
2 teaspoons vanilla extract
Instructions:
Start by making the cakes. Preheat the oven to 180˚C (350˚F).
Sift the flour and cocoa powder three times and set aside.
Place the eggs and sugar in a big bowl of an electric mixer and beat for 8-10 minutes, until thick, pale and tripled in volume.
Sift the flour and cocoa powder over the egg-mixture and gently fold through.
Fold through the melted butter.
Grease three 22 cm (9 inch) round cake tins and line the bases with parchment paper.
Divide the batter over the three cake tins and bake for 25 minutes until the cakes are springy to the touch and come away from the sides of the tin.
Let the cakes cool completely on wire racks.
For the raspberry filling, drain the thawed berries, reserving the juice in a liquid measuring cup.
Add water to the juice so that the total liquid equals 1 1/4 cups.
Add the liquid to a medium saucepan with the sugar and cornstarch.
Heat over medium-high heat, whisking occasionally, until the mixture begins to bubble and thicken. Keep whisking to make sure there will be no lumps.
Once thickened, remove from the heat and whisk in the lemon juice.
Fold in the drained berries with a spatula.
Cover and chill until ready to use (the filling will continue to thicken as it chills).
For the ganache filling, place the chopped chocolate in a heatproof bowl.
Heat the cream in a saucepan and bring to a simmer.
Immediately remove from the heat and pour the hot cream over the chopped chocolate.
Let stand 1-2 minutes, then whisk together until a smooth, thick ganache is formed.
Whisk in the butter 1 tablespoon at a time until completely incorporated.
Let the ganache sit to thicken a bit so that it is suitable for spreading and piping (this can take quite a while, to speed thickening, place the bowl in the fridge or freezer and whisk every 10 minutes to ensure even cooling until the desired consistency is reached).
Transfer about 1/2 cup of the thickened ganache to a pastry bag fitted with a plain round tip about 1/2-inch in diameter. Reserve another ½ cup of ganache in a small bowl or container (this can be used later for decorative detailing, if you want to).
Now it's time to start assembling the cake! Place one of the cooled cake layers on a cake board or serving platter.
Spread 1/2 cup of the ganache in an even layer over the cake. Using the reserved ganache in the pastry bag, pipe a border around the perimeter of the cake layer. This border will keep the raspberry filling in place, so make sure it is completely closed. If the ganache is a bit soft when you pipe it on the cake, put the cake with the ganache border in the fridge, so it becomes more solid.
Spoon some of the raspberry filling inside the ganache border in an even layer.
Top with another layer of cake and repeat this process, layering with another 1/2 cup of ganache and additional raspberry filling.
Top with the remaining cake layer.
The cake is really coming together now! The next step is the raspberry frosting. Combine the sugar and egg whites in a heatproof bowl set over a pot of simmering water.
Heat, whisking frequently, until the mixture reaches about 70°C (160°F) and the sugar has dissolved.
Transfer the mixture to the bowl of a stand mixer fitted with the whisk attachment.
Beat on medium-high speed until stiff peaks form and the mixture has cooled to room temperature, about 8 minutes (the bowl should be cool to the touch).
Reduce the speed to medium and add the butter, 2 tablespoons at a time, adding more once each addition has been incorporated and just keep going. If the frosting looks soupy or curdled, continue to beat on medium-high speed until thick and smooth again, about 3-5 minutes more (or longer).
Blend in the raspberry puree and vanilla until smooth and completely incorporated.
Frost the top and sides of the assembled cake with the raspberry frosting, smoothing the surface as much as possible.
Chill for at least 30 minutes!
To make the chocolate glaze, place the chocolate in a medium bowl.
Heat the cream in a small saucepan over medium heat until simmering.
Pour the hot cream over the chocolate and let sit 1-2 minutes.
Whisk until the mixture is smooth and homogenous.
Blend in the vanilla.
Pour the glaze into a pitcher or measuring cup and let cool for 10 minutes (do not let the glaze cool too long or too short or it may become difficult to pour over the cake).
Slowly pour the glaze over the cake, ensuring that the top is covered and the glaze slowly drips over the sides.
Let the glaze set about 5-10 minutes.
Transfer the reserved ganache to a pastry bag fitted with a decorative tip. Pipe swirls of ganache around the edge of the top of the cake and top each swirl with a fresh raspberry.
Chill the cake until ready to serve.
Subscribe to:
Posts (Atom)